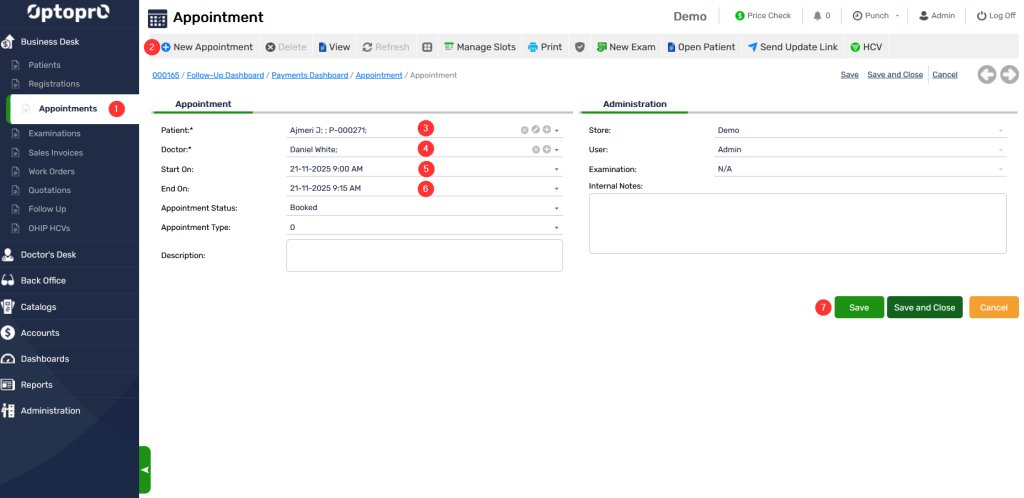
-
Updates
-
Patients
-
Appointments
-
Examinations
-
Sales
-
Inventory
-
Catalogs
-
Dashboards
-
Resources
-
System
-
Integrations
Appointments
Appointment section is designed to streamline and manage the scheduling of patient visits to ophthalmologists/eye-care clinics. It offers various viewing options, such as daily, weekly, or monthly calendars, to help staff manage the schedule effectively.
Key functions of Appointment
Online Appointment Booking offers an online portal or mobile app that allows patients to book their appointments directly, choose their preferred doctor, and even select the type of consultation they need.
Appointment Scheduling
allows the receptionist or medical staff to book, reschedule, or cancel appointments.
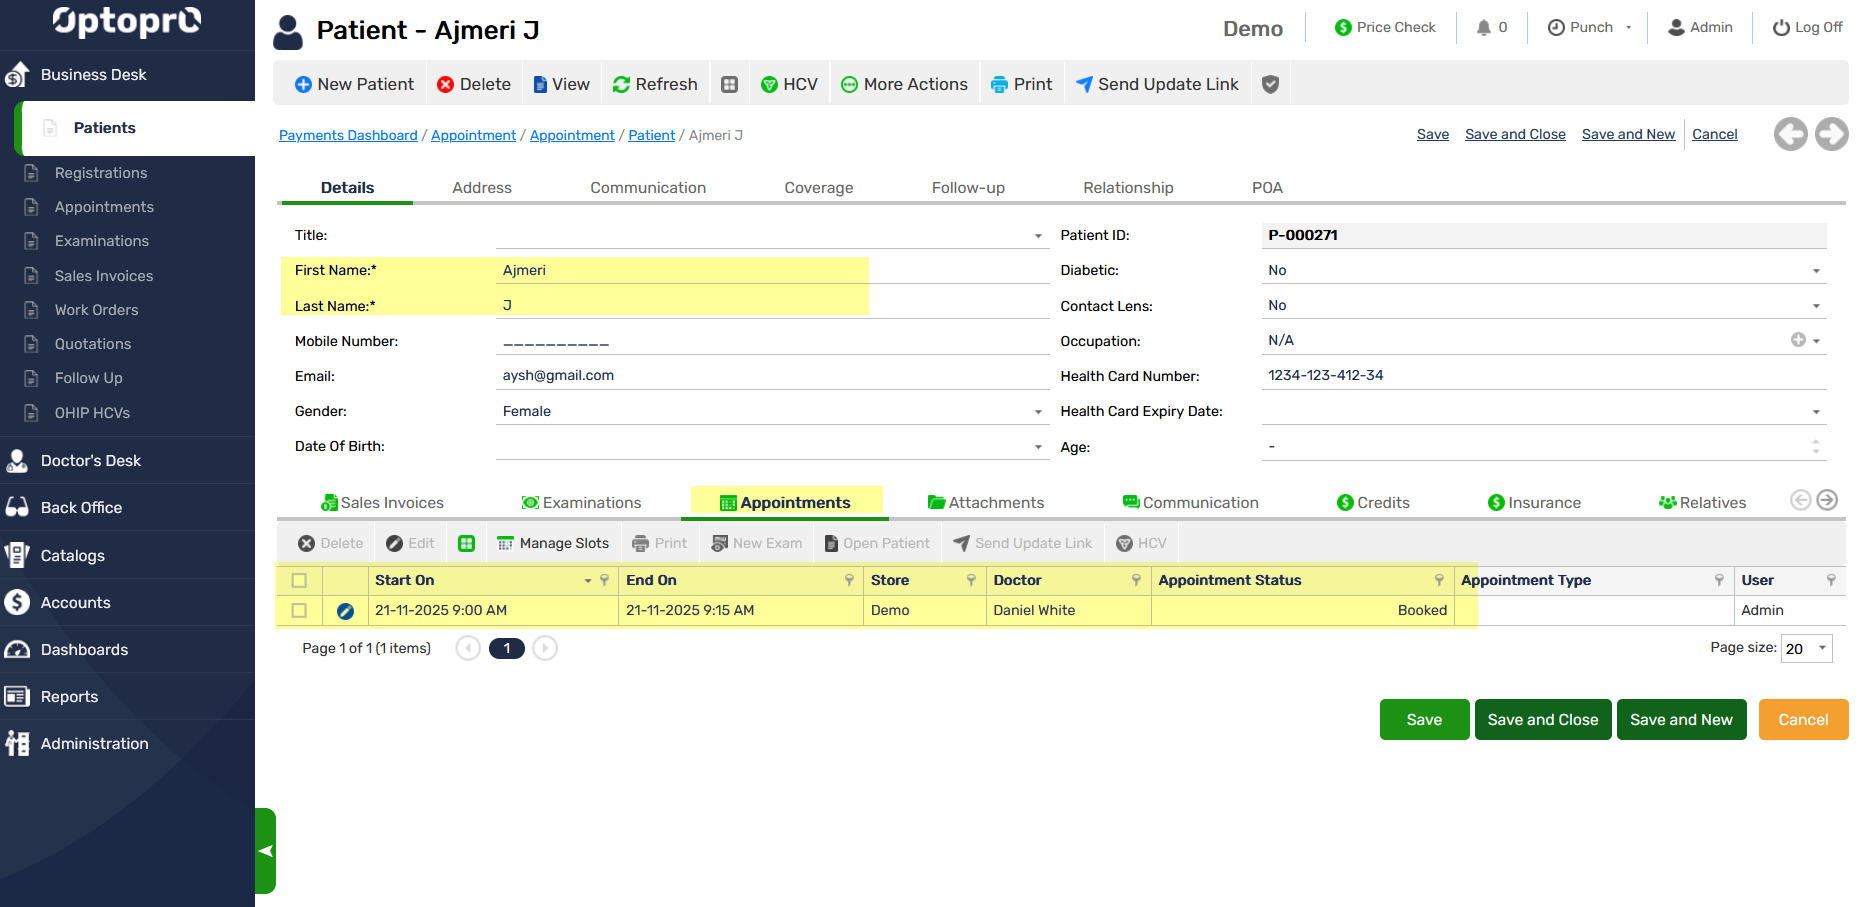
Patient Registration
integrates patient registration at the time of appointment scheduling. New patients can provide their personal details, medical history, and other relevant information before their visit.
Appointment Types
enables the categorization of appointments based on the type of service needed, such as routine eye exams, consultations for specific eye conditions, surgeries, or follow-up visits.
Doctor Schedule
It displays the availability of different ophthalmologists, allowing appointments to be scheduled based on their availability.
Reminders and Notifications
It sends automated reminders to patients via SMS & Emails about their upcoming appointments.
New Appointment Workflow
Follow the steps in the image above to book appointment for the patient.
Step 1: On the left panel click “Appointments”
Step 2: Click on “New Appointment”
Step 3: Type the patient name or select from the list
Step 4: Select the doctor from the existing doctors in drop-down list or you can add a new doctor by clicking on the “+”. Refer Add a new doctor
Step 5: Select the start date and time from the calendar
Step 6: Select the end date and time from the calendar
Step 7: Click “Save” to save the appointment
Once the appointment is booked, you can view it under the “Appointments” tab in patient’s profile as shown below
Key functions of Slot Management
Dynamic Slot Allocation
It allocates slots based on the type of appointment, the estimated time required for different procedures (e.g., routine eye check-up vs. a detailed consultation for a specific condition), and the availability of resources.
Customizable Time Slots
It allows clinics to customize the duration of different appointment types. For example, a new patient consultation might require a longer slot than a follow-up visit. This customization ensures that each appointment type is allocated an appropriate amount of time, reducing overruns and delays.
Real-time Availability Updates
It updates slot availability in real-time as appointments are booked, rescheduled, or canceled. This feature helps in maximizing the utilization of available slots and reduces the chances of double-booking. Doctor and Resource Scheduling: It integrates the schedules of ophthalmologists. This ensures that appointments are only scheduled when both the required personnel and resources are available.
Overbooking & Buffer Management
It controls overbooking to account for no-shows and last-minute cancellations.
Priority Scheduling
It enables the prioritization of appointments based on urgency, such as allocating slots for emergency cases or prioritizing surgeries over routine check-ups when scheduling resources.
Block Scheduling
It allows blocks of time to be reserved for specific types of appointments or procedures. This can help in managing the workload and ensuring that sufficient time is allocated for more complex or time-consuming procedures.
Multi-location Support
For practices operating in multiple locations, it helps to manage slots across different sites, allowing patients to book appointments at their preferred location based on slot availability.
Patient Preferences
It accommodates patient preferences for specific time slots or doctors, enhancing the patient experience and satisfaction with the service provided.
New Slots Workflow
Step 1: Select the store from the drop-down list, to book the appointment for the respective store.
Step 2: Select the doctor from the existing doctors in drop-down list or you can add a new doctor by clicking on the “+”. Refer Add a new doctor
Step 3: Select the Type of appointment from the drop-down list
Step 4: Select the period of the slots, for e.g. once or weekly. You can also opt to create the slots for alternate days by checking the box for “Alternate Days”
Step 5: Select the start date and time from the calendar
Step 6: Select the end date and time from the calendar
Step 7: Enter the duration of the slot
Step 8: Select the action from the drop-down list i.e. to create or delete the appointments
Step 9: Click “OK”
Slots are ready for booking the appointments for the patients.
Weekly Slots Workflow
Follow the steps below to create weekly slots for appointment (alternate days)
Step 1: Select the store from the drop-down list, to book the appointment for the respective store.
Step 2: Select the doctor from the existing doctors in drop-down list or you can add a new doctor by clicking on the “+”. Refer Add a new doctor
Step 3: Select the Type of appointment from the drop-down list
Step 4: Select the period of the slots as weekly. To create the slots for alternate days, check the box for “Alternate Days”
Step 5: Select the start date and time from the calendar
Step 6: Select the end date and time from the calendar
Step 7&8: Check the box for Alternate days along with the day of the week
Step 9: Click “OK”
Slots are ready for booking the weekly appointments for alternate days.